Sunday, August 26, 2012

Backsplash Dilemma

Within the past few months, I realized I really wanted a backsplash in our kitchen. I feel very blessed to have an updated kitchen. We had granite, new cabinets and brand new appliances when we moved in. None of it I would have picked out, if given the opportunity, but everything is nice and I really have no complaints.

As soon as I started thinking about adding a backsplash, I was on the look out for something I loved. I really love the mosaic glass tiles (and I love the price even more). However, we have Santa Cecilia granite in our kitchen which looks too "busy" with the mosaics. I decided I needed something monotone to balance the granite but didn't want boring.
Luckily, this is a popular granite which means most stores had a sample out for me to test different backsplashes. I think I tried every tile in both Home Depot and Lowe's and couldn't find anything that would go with the granite. Well, I should say anything that would go with the granite that I liked.  

This weekend I headed over to Floor & Decor to check out what they had.I was shocked to find out that HALF their huge warehouse is backsplash tiles! I snapped lots of pictures at their Santa Cecilia style center before getting the help of their designer, Stacy. Here are some of the no go options:


She was super helpful and recommended a tile I loved. I bought a broken clearance piece to take home and show the husband. Here it is in our kitchen: 


The husband was not a fan. It's hard to tell in the picture but the tile has a lot of sheen to it. It looked amazing in the store with cappuccino grout and trim. 

At this point, we ran to Home Depot for some painters tape. We walked by the cabinetry section and spotted a stainless steel tile we both loved. Turns out it is Apect Tile which is a peel and stick option. We decided to take home a box to play around with different designs and to see what we liked. At this point I was leaning toward the vertical design but once I got home I feel in LOVE with the subway tile design. 


So after reading a lot about the product, we are going for it! I am excited and nervous. The install is supposed to be easy based on the reviews. We have to decided against using the peel and stick and opted for the adhesive method. 

With Issac on his way to the area and an extra day off tomorrow, the project may get underway( dare I say finished?) before the labor day weekend!

Thursday, August 23, 2012

Primer, Primer, Primer

We have been working away on the garage clean up. In between coats of paint, I decided I would finally tackle painting the front door. When we moved in, we had to replace the front entry door as the existing door did not fit correctly. It was a simplye pre-primed white steel door (unfortunately, something fancy was not in the budget)!

I decided to use exterior white and interior white based on the side. I also painted all the trim. I set to work cleaning the door and then loosely sanding the surface of the door. I painted all the trim first. Since the door was already primed, I started rolling the door with exterior white (to match our trim) with a small foam door &cabinet roller. The first coat went on great. While waiting for it to dry, something bizarre started happening: I was getting debris when I was rolling. So, I switched to a new roller thinking maybe it was the foam from the roller. No luck.

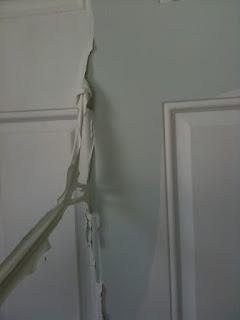
So I stopped. As time went on... this occurred:
The paint did not adhere to the door AT ALL while the trim looked fantastic. I was frustrated and annoyed! So I turned to google for answers. I read that this is a common problem. Supposedly, pre-primed doors that have been exposed to the elements for more than 30-days need additional primer before paint. Unfortunately, this meant that I have to remove all the paint before I could reprime the door.

Luckily we were able to peel off the majority of the paint but the primer did it's job in other areas and the paint STUCK!
At this point, I decided a trip to Lowe's was in order. I purchased a spray can of Goo Gone and an amazing little 5 in 1 painters tool. We spent about an hour scraping the remaining paint off the door.
The primer did the trick. It still needed two coats of paint to get the job done but things are looking much cleaner and brighter!

On a side note: this weekend we purchased some preprimed MDF from Lowe's to use as a baseboard in our garage. We purchased and immediately came home to paint it. Even with no exposure to the elements, we still experienced an issue with peeling on one of the three baseboards! My new mantra is PRIMER, PRIMER, PRIMER(regardless)!

Saturday, August 18, 2012

Absent blogger (with a project).

Where has August gone? Seriously, this month has been a bit of a whirlwind! The first three days of the month were crazy busy with our accreditation audit at work. Last week I took two days off with the hubs since he started back at work this past Monday. We spend a four day weekend tackling our garage (post to come soon). And somehow it is already the 18th? Time is going by too fast!!

To get myself back in the blog routine, I wanted to share a project I finished up a few weeks ago. At the end of July, we went to a local third Friday street festival. They had a vendor there selling letter art comprised of pictures of different letters. Well, my married last name is kind of lengthy which made the price close to $50. Being the cheap-o that I am, I decided that I could make it for far less.

First, I went to the Dollar Tree and purchased 8 3.5X5 inch frames. They only had black or brown so I picked up the black ones and spray painted them white.


Next stop was a trip to Lowe's where I purchased a  piece of wood. I used a 2x6x8 which I had cut down to the appropriate length (mine was 36 inches). I already had stain and poly at home so this trip cost around $5.


I applied three coats of stain because I wanted the wood dark enough to match our bedroom furniture. I also really wanted the white frames to pop on the dark surface. I let the stain dry overnight, then applied a coat of poly.


The next day, I found the letters I wanted to use on this Flickr site (its FREE). I used my home printer and just printed them to size on photo paper. After putting all the letters in the white frames, I used hot glue to adhere them to my wooden frame.
Here is the final product:


I LOVE the way it turned out. Total cost was under $14! I must admit though, it is still sitting in the guest room. I know where I want to hang it but am unsure about the placement until we install the new light in the master bedroom. I will update once its is actually on the wall!