Wednesday, October 22, 2014

Pool Party 1st Birthday Party

The day before Charlotte's official birthday, we held her party at my parent's house. I have been planning for quite some time to have a Pool Party Theme. I had been "pinning" things for MONTHS!

I ended up purchasing a party package on Etsy that included the bulk of the decorations I would need for the party. I used ForeverYourPrints and was really pleased with their products and promptness. I had everything printed at Staples and then cut/ assembled everything myself.

I kept everything in the pink/yellow/ blue color scheme. I ordered a bunch of beach balls to hang over the food table.


Speaking of food... I tried to keep things within my theme. Somehow it didn't turn out quite as good as the Pinterest counterparts!


Her cake was from Publix. When we took her for her smashcake session, she HATED cake so I wasn't sure how it would go at her party. While she didn't LOVE it, she tolerated it much better than she did during her photoshoot!


For favors, I had beachball cake pops made by Pop Goes the Party. I then added individual bags and tags to each one, thanking everyone for coming to her party.


I also ordered a 1st Birthday Chalkboard print from Lilly La Manch on Etsy. Staples was able to print this in an 11 X 14 for around $5. I got the frame for cheap at Joann's and we have actually been able to use it for several other projects already!

Aside from the party, our gift to her was an "Anywhere chair" from Pottery Barn Kids. She took right to it and continues to use it on a daily basis!  She LOVED opening up gifts :)


It's amazing how fast her first year went by! I feel so blessed to be this little girls momma!! :) 

Sunday, October 12, 2014

4th of July Crafts

So this post is LONG overdue! I realized I never shared my 4th of July projects this year. There were a few of them that turned out great so I didn't want to skip over it even though its about 3 months late...

While not technically a project, I picked up some table decorations from Kohls. Not sure if I have ever mentioned it here but I seriously LOVE Kohls. The stackable coupons and the Kohls cash... you really can't do better. I want to say I was able to pick up everything below for under $20.


The next thing I tried my hand at were 4th of July vases. I had some mason jars lying around so I decided to try my hand at painting a mini- flag across three jars.


First I painted one jar blue and the other two white. After they were dry, I used blue painters tape to make my stripes on two of the three jars. I used a star stencil to paint a white star on the blue jar. I had a lot of bleed through on my tape. I think this is because the jar is round and had ridges so there were certain areas where I didn't get the best "seal".


I used a small paint brush to go over the stripes and that made things look much better. I added some cheap $3.95 flowers from the grocery story and displayed them in the bar area of our kitchen.


The last project I completed was a pallet American Flag for the front yard. The company my dad works for is constantly getting rid of pallets so I asked him to keep an eye out  for one that was in decent condition. I didn't realize how large they were, almost too large for where I planned to display it. So Tim and I cut it down to a more appropriate size. I used the same paints I purchase for the jar project above... Chalk paint I purchased on sale at Joann's.

Since its raw wood, I used a primer first knowing it would soak up the paint.

After the primer, I used two coats of each color. When it dried, I stenciled on the white stars.

We placed the pallet in our new Palm Tree that I mentioned here. All the plants are growing so fast I have to trim them constantly!


We also pulled out the pallet flag for Labor Day last month and will likely so the same on Memorial Day.


Monday, October 6, 2014

People I Love Board Book

Charlotte LOVES to look at the pictures we have hung around our house. She points and identifies "dada", "mama" and "lola". So I decided I want to make her a book of her family. I didn't want to go the cheap route of using an old 4X6 slide in photo album. I thought about using Shutterfly since I am always getting great promotional codes from them. But Charlotte is ROUGH on books. She has destroyed many books with "regular" pages so I was pretty adamant about having a board book.

I did a little research on companies that allow you to customize board books. I wanted something good quality but also not super expensive. I ended up going with a company called Pint Size Productions. I went with their "Simple Photo Book 2" design and uploaded each picture file and was able to customize text. They also have themed books if you want the option of less customization or if you were creating a book for a holiday.

The company was very responsive. I was unsure if my order process and they were very prompt in replying to me. They estimated 7-10days for shipping. I placed an order Monday night and had my book in hand by Friday... I was pleasantly surprised about how quickly I received my order!

The book is a great quality and the best part is Charlotte loves it just as much as I thought she would. Of course, her favorite pages are "dada" and "lola".


The cost of the book was $24.95. They have a promotional code listed on their Twitter account for the Fall which did save me a few dollars. I will defiantly be using them again in the future. This would make such a great gift idea as well! Here is a sample of how I set up the inside of the book.


The back allows for an dedication and a photo as well.


Monday, September 22, 2014

Charlotte: Month 12


+ She really wasn't feeling the pictures this month!

+ Walking!

+ Loves watching Baby Sign Time.

+ Loves snacks and picking what she likes out of the pantry.

+ Can signs "more" and "all done".

+ Points to pictures and says who it is: dada, mama or lola.

+ Weighs 20lbs.

+ I can't believe I have a 1 year old!!!!

Saturday, September 6, 2014

The Living Room Take over

Charlotte is slowly taking over our living room! We wanted to add a space for her stuff but also still wanted it to be an adult room since we spend A LOT of time in that room as well.

We decided to add a small bookshelf next to the bar. We picked one up at Target for around $50 and anchored it to the wall. The shelves store some of Charlotte's toys and books. We made the top of the bookshelf into a "docking station" for us.


The shelves above the new bookshelf have been there for a bit. They were also a Target find. They two shelves came with 2 5X7 frames to match. The framed print was our anniversary gift this year and I am kind of obsessed with it! It is one of the "What a difference a day makes" prints that you see all over Pinterest BUT I found one Etsy shop that printed on burlap. I had her customize it to fit a few extra dates but I LOVE it. 


Another major change in the living room was the addition of a gate. I do not understand why babygates are SO ugly! I mean honestly, they are either gray plastic or made of mesh! We had a large opening which narrowed our options even more. We wanted to be able to block off the opening into the living room and keep Charlotte off the tile. The opening use to be a sliding glass door so it is LARGE. After scouring the internet and coming up with nothing I liked, we decided to make our own. Other than coming up with the idea, I was not AT ALL involved in this project. My dad and time spent around $60 on supplies at Lowe's and set to work. They used wood and PVC pipe to construct three panels: two to be mounted and the other to act as the gate. We coated everything with Oil rubbed bronze spray paint and let it dry for a few days before installing. We used a simple latch for the gate and secured it to both walls. SO much better that the mesh gates!


Sunday, August 24, 2014

Charlotte: Month 11

-Takes 3-4 steps without assistance

-"Talks" constantly- mama, dada and ola- her version of Lola

- Weighs 20 lbs (and somehow still fits in this 6m onsie)

- Loves to comb her own hair

-LOVES ice cream... paces in front of us when she knows we're eating it

- Drinks water from a cup.

- Claps and waves. 

Tuesday, August 5, 2014

Highchair Makeover

With Charlotte's first birthday quickly approaching, I have been scouring Pinterest for photo ideas. We have actually booked with the photographer who did her newborn pictures for her 1-year pics BUT I also want cute pictures for the party itself. We have decided to have her party at my parent's house this year and so I started to think about where we will do the smash cake. After seeing lots of pictures on Pinterest, I decided I would keep my eye out for a wooden highchair.

About 2 weeks ago, I had my annual physical (which I haven't done in 2 years since I was pregnant last year) and I noticed a kids consignment shop across the street so I decided to pop in and see what they had in. First thing I saw when I walked in the door was this little guy sitting by the door.


It was pretty beat up and I had a hard time removing the tray. The shop owner helped me fix the sliding tray so that everything was functional. Everything else was cosmetic and could be fixed with some sanding. The shop owner ended up taking $5 off so I scored the highchair for $20! 

At this point I wasn't really sure how I wanted to refinish it. I honestly wasn't expecting to fid a highchair so easily. I found lots of ideas that I liked but these were some of the top contenders: dark stain, Teal chalk paint, or a basic white. 

In the end, I was a creature of habit and decided to go with what I knew I would love. I also wanted it to be something we would get use out of AFTER the party. So while a teal/aqua colored highchair would be fabulous to have at her party, I wasn't sure how much it would get used after. So I decided to go two tone, just like Charlotte's dresser

I didn't take step by step pics BUT it was fairly simple. This particular wood did give me some trouble so there were a few more steps then usual. 

1) I wiped everything down with deglosser.
2) I started with the roughest grit sandpaper for the tray and worked my way to the finer stuff until the tray was back to raw wood.  I used three different grits with the finest being 220. 
3) I used the 220 grit paper to rough up the surfaces of the highchair itself. Because I was going to paint that part I did not need to strip it completely. 
4) I removed all the dust. This was the hardest part!! 
5) I used Valspar White Satin paint for the "chair" part. It took 4 cans in total. LOTS of thin coats. The issued I had was some texture that would arise after painting. It was not noticeable but I could feel it so I ended up sanding it down between coats, removing the dust and painting another coat. This did help but it made the process much longer. 
6) The top also has the same issue with texture and the wood really ate the stain. It took 5 coats of stain and 2 coats of poly to get the right shade and sheen I wanted. We applied the stain with cheesecloth and used super fine steel wool between coats to remove any texture. The stain is my go to stain: Minwax "Red Mahogany".  Followed by Rustoleum's gloss spray poly. 

And the finals results are perfect:

I spent $20 on the highchair and $20 at Lowe's on spray paint and poly. I already has everything else on hand from my last project. Not too bad for $40! 

Tuesday, July 22, 2014

Charlotte: Month 10


+ Weighs 19.8 pounds

+  Stands without assistance

+ Can walk with her walker or holding onto the edge of the couch

+ Says "da da".

+ Tries to say "ma ma".. it comes out "na na" and we go with it!

+ Fights with Lola over who gets the Little People animals

+ Tries to stand up in the tub and thinks its SO funny.

+ Started ISR lessons

+ Favorite food is still Avocado

Tuesday, July 1, 2014

Father's Day 2014

Since this year was Tim's first official Father's Day, I thought it deserved its own post. I spent a good deal of time putting together his main gift this year. It was fairly simple but getting an almost 9 months old ( at the time) to cooperate is no easy feat!

I had to get my Mother-in- Law to assist: one of us to take pictures and one of us to distract the baby!


In the end I am really pleased with the way it turned out. So much so that I replicated the idea for the grandpas :)

I had a REALLY hard time finding a horizontal triple frame so I ended up having to use a vertical one.  I also ordered some custom fishing bobber cake pops and a sweet card from Charlotte.


We spent a pretty low key day together as a family and Tim loved his gifts. Charlotte is SO blessed to have such an AMAZING daddy! :)

Sunday, June 22, 2014

Charlotte: Month 9


+ Crawls everywhere! Starting crawling on Memorial day.. shortly after her 8 month update!

+ Can sign milk: she doesn't know how to use it in context yet but we are working on it!

+ Pulls herself up on anything within reach.

+ Loves the puppies... they never cease to make her laugh. Unfortunately, we had to put down our youngest pup this month who interacted the most with Charlotte. Our hearts are still heavy :(

+ Only wants to feed herself... wants nothing to do with the spoon. Her favorite food at the moment is  avocado.

+ We call her a " puff addict"... she gets SO excited when she sees the container.

+ Has the best giggles.

+ Has officially been out as long as she was in!


Saturday, June 21, 2014

Let there NOT be light

Around 11 months ago, when I was still pregnant and working on the nursery, I had a harm time justifying the cost of Blackout curtains. As I mentioned then, I opted for the regular panels. I don't want to say that I regret that decision but Charlotte's room was TOO bright.. even with blinds and curtain panels.

The reason I say I don't regret the blackout panels is that I am not 100% sure they would have made a difference in our case. Because Charlotte's room has 2 windows and 2 closets, we had no choice but to place both the crib and the dresser in front of the windows. So while she does have curtains, opening and closing panels behind the furniture would be super difficult (and noisy) to do each time the baby was sleeping.

So back in December, we decided to try our hand at tinting her windows. The only product our local Lowe's had in stock at that time was the Gila Glare Control Bronze. Honestly, we didn't really research anything in advance and just picked up one roll to try it out on one of the windows in the nursery. We lived with it for a couple of weeks and it did made a difference in the amount of light coming through. So, we decided to go back to Lowe's to purchase a second roll to tint the window behind the crib. This time they were fully stocked and we found Gila Privacy Control Black. It also is room darkening which is EXACTLY what we were looking for. So we tried that on the other window. It was perfect: the room was significantly darker and you can't see anything if you peer in from the outside. Oh and her room stays cooler!

We left one window bronze and the other with the privacy control film for a few days before deciding to replace the original bronze window with the privacy control. I thought this would be a nightmare but it was relatively easy to remove and didn't leave any residue on the windows.

As far as application goes, we laid the film out on the tile floors, measured the windows and cut each panel to size. You can really only get one average/large sized window per roll of the product.

We cut the product into two rectangles and applied one at a time rubbing out the bubbles as we went.

Overall the application went well: we don't have any bubbles and the product looks great. Our corners aren't perfect but there are blinds over the window anyway so you don't really see it unless you are looking for it.


We have lived with the product for about 6 months now and have been extremely happy with it so far! 

Wednesday, June 18, 2014

Front Yard Makeover Part 2

After my original battle with the City I mentioned in this post, I had a REALLY hard time finding a Palm on their "approved tree list" that was less than $2k just for the tree. I called the City several times and no one ever got back to me. So honestly, I left things looking like this a little longer than we had intended too.


Finally, I decided to plant a tree on their list but it did not meet the size requirements. I went to a local nursery and purchased a Large Triple Robellini Palm and picked out several other plants to compliment it. Due to the size of the Palm, I decided to go ahead and hire the nursery staff to go ahead and install everything.
 Lucky for us, we had a HUGE rain storm after they got done planting that day. We were able to center the new plants and transplant the sod to the circle area where the tree use to be. Everything filled in really well and we had quite the weekend transformation on the front yard!


Part of me loved having the tree in the front.  I always thought we would hang a swing there for Charlotte. But this makes things so much easier! Tim was spending so much time each weekend raking and cleaning the front patio. We couldn't let the dogs out front because of the all the acorns (they try to eat them)! Overall, we are really happy with the way things look now. The best part was all the plants and the install cost me just under $900!! Way better then my original $1700 estimate.

Oh and the best news... I requested an inspection from the City and passed:)

Thursday, May 22, 2014

Charlotte: Month 8


+ Loves standing.
+ Her favorite foods are yogurt and bananas.
+ Has two teeth!
+ Is so close to crawling.
+ Makes us laugh everyday.


Tuesday, April 22, 2014

Charlotte: Month 7


+ Almost Crawling

+ Eats "real" food- Loves sweet potatoes, avocado and banana. HATES green beans. Prefers to feed herself so we are going more that Baby Lead Weaning ( BLW) route these days over purees.

+ Had her first round of antibiotics due to a double ear infection.

+ Weighs 17.4 pounds.

+ No teeth yet but her two bottom teeth are about to break through.

+ Has the most infectious little laugh.

+ Her hair is coming in quite red these days :)

Saturday, March 22, 2014

Charlotte: Month 6


+ Sits unassisted. Now ALL she wants to do it sit up.

+ Trying to crawl but cannot get her legs going.

+ Got Baptized.

+ LOVES the dogs. Laughs every time you say " Is that your puppy"? Surprisingly, the dozes are handling her quite well.

+ Sits in her highchair with us at dinner time. Loves to eat "ice pops"- Frozen breast milk.

+ Reaches to be picked up.

 How is my little baby half a year old?

Wednesday, March 5, 2014

Pink and Gray Dahlia Nursery

I started this post in December. Of course that was when I went back to work full-time so it got stuck in Draft until I could take some decent pictures. Anyway, the Nursery is DONE....finally. I had ordered  few custom pieces that took longer than anticipated but everything is hung and decorated now. It's hard to believe my last nursery post was back in July when I purchased the rug. So here is what things looks like today.

It is by far my favorite room in the house. The bedding is the Dahlia Pink Collection from Pottery Barn Kids. I purchased only 2 fitted sheets and the quilt although we are not using the quilt yet.

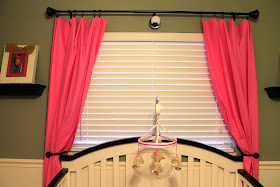
My work surprised me with a baby shower and purchase a video monitor for us which I LOVE now that Charlotte is sleeping in her crib overnight. Tim hates seeing wires so he rigged up the monitor to look down on the crib so that we could hid the wires behind the curtain panel.


I did not a mobile initially. My mom insisted that Charlotte have something to look at. I have no idea why mobiles are so expensive. I wanted one that matched so I went with the Bright Pink Harper Mobile from Pottery Barn. I saved some money by purchasing it off eBay though.

The chair is from Babies R Us and the end table is a Homegoods find. The lampshade and pillow are also the Bright Pink Harper Collection. I LOVE the monogram but it was one of the custom pieces that took a while. I ordered it from Etsy. I love the way it turned out and ultimately think it was worth the wait. It did not come until well after Charlotte was born but its not like she noticed. I purchased them through the shop Simplymade. The "C" & " G" are 10 inch Victorian letters with the Pink Dahlia design. The "H" is a 12 inch Victorian letter with the gray lattice stitching.

The other custom piece I had done was the small sign between the double closets.
I ordered it from CreativeTouchWood on Etsy. I had her customize it to the gray/pink color scheme and it turned out great!

We worked so hard on the nursery and I love that such a family effort. Tim and I painted the walls before we even knew the gender. Tim and my dad did all the moulding work. I worked so many hours sanding, painting and staining the dresser. Tim stained the shelves. Tim and my dad assembled all the furniture. Oh and my mom... she helped me shop! Little girl stuff it SO much fun to shop for. 


So this officially wraps up the nursery posts! I must say it is a little sad, considering they started close to 10 months ago!