I really love the look of two-toned furniture so I decided to start skimming Craigslist for a used solid wood dresser. The very first day I came across one I liked but thought I was rushing into it. A search a few days later showed that it was still available so I sent over an email and made plans to look at it the following day. It is a solid wood Thomasville Dresser with dovetails and hidden "jewelry drawers". It has a small blemish on the top which didn't bother me in the least since we had plans to refinish it anyway. We quickly handed over $140 and took this guy home with us!

The first thing we did was remove all the drawers and hardware.
 |
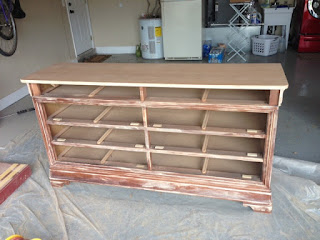
| As you can tell by the stacked boxes, this was in the middle of our lighting project! |
The hardware was very unique and I contemplated keeping them and giving them a coat of ORB spray paint. But in the end they got donated to the Habitat for Humanity Restore. They did leave us with two sets of holes in each of the 6 regular drawers.

Next step was to get supplies. Since this was our first time refinishing furniture, we opted to borrow a sander as opposed to purchasing one. My dad let us borrow his Dewalt sander and luckily he had a ton of sandpaper as well so that was another savings. I did purchase a few 2 inch drawer and cabinet rollers, 2 trim trays made for the smaller rollers, primer, paint, wood filler and spray poly.
Since I knew I wanted a two tone look, we had to strip the top of the dresser and the two hidden drawers of all the stain. The bottom portion was only getting painted so we really just needed to rough the surface up so that the paint would have something to grab on to.
Tim started the sanding but quickly got bored and opted to go fishing instead.
 Meanwhile, I patched the hardware holes in the drawers. I just used basic Elmer's Wood Filler. I put on one thin coat, let it dry for an hour and then added a second coat.
 While the filler was drying, I took over the sanding. The pregnant lady had to take lots of breaks but eventually got it done!
 I started with coarse sandpaper and gradually worked my way down. On the top I used coarse, medium, fine and very fine sandpaper until a reach a nice even texture that would be ideal for staining. On the bottom portion I skipped the coarse and very fine paper. The worst part of sanding... the dust. It was EVERYWHERE. I waited for Tim to help me clean up the dust so we could get a coat of primer on the dresser that evening.
I purchased Zinsser primer since I heard good things on other blogs. I wasn't impressed and actually prefer my usual Valspar primer. I purchased this stain blocking primer. I purchased good paint that supposedly didn't need primer however since I opted not to sand it down to raw wood, I thought primer would work in my favor. The coverage was very inconsistent and although I only used one coat of primer, it probably needed two to be a good base for the paint. We rolled a quick coat of primer that evening and let it dry overnight. Since it is oil based, we opted to throw out the roller and pan and start over with fresh the next day.
 On to paint. I have heard AMAZING things about Benjamin Moore's Advance paint. I went to the local Ace which carries Benjamin Moore since there isn't a regular Benjamin Moore Store near me. They didn't sell the advance formula but gave me the name of another retailer locally that did. He also gave me a bunch of paint samples to go home and color match before heading to the other store. I held the samples up to the crib and selected "Super White".
Let me tell you, the paint ain't cheap! I purchased a gallon and it cost me $50! I opted for the gallon because I have some other upcoming nursery projects that will need it but I definitely could have gotten away with a Quart. After 4 thin coats on the dresser, I still have almost a full gallon. It is a self- leveling paint with alkyd so it hardens and has a really nice finish. It is recommended for drawers and cabinets, really anything with movement. Definitely worth the extra cost!
 Like I said, we opted for 4 thin coats because we still had a lot of stain showing through the primer. They recommend 24 hours of drying time between coats and 4-5 days of dry time after the final coat before attaching drawers, doors, etc. So we simply did a coat a night after work, which maybe took 10 minutes?
 Next up.. staining! We actually didn't have to purchase any stain for this project. Turns out the stain I purchased for this project was a dead match to the crib we selected. It is Minwax Red Mahogany.

Years ago, my dad used to professionally stain cabinets for a living. So he asked if he could stain the top of the dresser. Here he is hard at work.
 He used cheesecloth and we applied two coats of stain to get the right finish.
 After the stain dried completely, we were ready or polyurethane. I purchased three cans of Rustoleum's spray interior poly in gloss. We made sure to protect our white paint by taping a plastic tarp around the bottom portion of the dresser.
 In between coats of poly, he used extra fine steel wool to remove any dust traces that bubbled to the surface. I think we used 2 1/2 cans of the poly for a total of 4 thin coats... which got us a really nice sheen.

Back to hardware. I selected two knobs from Lowe's.
 The top knob was the cheaper of the two but I really felt like the size of the dresser called for something a little larger. Ultimately, this guy won the race:

Installing the hardware officially wrapped up the dresser project. Here is what the final product looks like:

 Oh and because I love comparison shots. Here is what we started with and the how we ended.
I am in love with the way it turned out. I originally thought about staining the drawers too but I am SO glad I decided to keep the whole base white. It looks so much better that I could have imagined and ended up being significantly cheaper that its $700 Babies R Us counterpart. I think we probably spent around $100 on supplies ( would have been less if not for the Advance paint but I have SO much left over). Not too bad for $240!
Since I knew I wanted a two tone look, we had to strip the top of the dresser and the two hidden drawers of all the stain. The bottom portion was only getting painted so we really just needed to rough the surface up so that the paint would have something to grab on to.
Tim started the sanding but quickly got bored and opted to go fishing instead.


I purchased Zinsser primer since I heard good things on other blogs. I wasn't impressed and actually prefer my usual Valspar primer. I purchased this stain blocking primer. I purchased good paint that supposedly didn't need primer however since I opted not to sand it down to raw wood, I thought primer would work in my favor. The coverage was very inconsistent and although I only used one coat of primer, it probably needed two to be a good base for the paint. We rolled a quick coat of primer that evening and let it dry overnight. Since it is oil based, we opted to throw out the roller and pan and start over with fresh the next day.

Let me tell you, the paint ain't cheap! I purchased a gallon and it cost me $50! I opted for the gallon because I have some other upcoming nursery projects that will need it but I definitely could have gotten away with a Quart. After 4 thin coats on the dresser, I still have almost a full gallon. It is a self- leveling paint with alkyd so it hardens and has a really nice finish. It is recommended for drawers and cabinets, really anything with movement. Definitely worth the extra cost!


Back to hardware. I selected two knobs from Lowe's.


Installing the hardware officially wrapped up the dresser project. Here is what the final product looks like:


 |
 |
No comments:
Post a Comment