Wednesday, May 30, 2012

Random Thoughts


+ The puppy, Lily, consistently wakes up early. After waking me up at 6:15 am each and every morning over the holiday weekend, the past two mornings she has slept till 7:15! I am hopefully that this will last. However, I have decided if she returns to the 6:15 wake-up calls, I am going to try to embrace it and go for a walk BEFORE work.

+ My husband told me this morning that it takes me longer to decide what shoes to wear then it does for me to pick out an outfit. This made me smile because it is 100% true: I LOVE shoes!

+ We have been rocking the workouts lately! Yes, you read that correctly, WE. Tim and I have gotten into a pretty good gym routine. Last week I worked out 5 days and this week I already squeezed in 4 workouts! I really want to register for a couple of 5K’s to help on the motivation front. I am considering the Color Run this December.

+ How is it almost June?

+ Last night, we had a swarm of flies in the house. We have no idea how they got in the house. The dogs were going crazy. Tim and I think it may have had something to do with the rainy weather? We walked around the house swatting flies for a good 30 minutes before heading out the gym. I am happy to report that we got them all. While we were grossed out about the flies, we also laughed hysterically at ourselves afterward. FYI: I am FAR superior at fly swatting then my husband! On a more serious note, it is moments like these that I feel so blessed to be married to a man who makes me laugh each and every day. 

+ I tried something new for dinner tonight, A Kale and Sweet Potato Fritatta. I got the inspiration from a new blog I discovered, Peanut Butter Fingers. I added a bit of cheese and spices and served it with a side of fruit, Strawberries and Pineapple. I liked it. Tim wasn't impressed. I think it was the Kale that he disliked. He dipped it in ketchup but I don't think I will be able to make it for him again. The good news is I have enough leftovers for two lunches. 
+ I am trying to fight off a cold. A sore throat came on me out of no where tonight. I had fresh pineapple with dinner ( Am I the only one that believes in this old wives tale?), lemon and honey tea and some Alieve. I am hoping a good night sleep will help! 

Tuesday, May 29, 2012

Shed Project: Phase 3 (& Final... hopefully)


This weekend we wrapped up the last phase of the shed project. If you missed it, we started building a shed in the backyard, with the help of my dad, back in January. (Here is a recap of Phase 1 and Phase 2).

We decided to run electricity to the shed to provide more outdoor lighting as well as to add a light/ fan in the shed itself.  I was nervous about this for several reasons: 1) it meant running a wire under my new lawn and 2) Both Tim and I know NOTHING about electrical work. Yet again, I am thankful for a handy father!

We picked up two smaller outdoor globes at Lowe’s in my favorite finish, Oil rubbed Bronze. Although, I must note they are a bit blacker than I was expecting. These have been sitting in our garage for a while now. Saturday, we made another trip to Lowes with my dad and spend an hour and half in the electrical aisle. It was HELL. I felt utterly helpless cause as I mentioned, I have no clue about electrical. In fact, at one point, my dad asked me to stop talking but I was disturbing his thought process with my incessant questions! J

I will be the first to admit that I spent much more than I anticipated! Luckily, I had a $25 gift card which helped, but I think even with that my total was around $120 (this also included a few items for another electrical project under the works).  The specifics of this project are not as detailed due to my lack of knowledge. I know that we used the outdoor plug at the back of my house to do two things: 1) run electrical across the yard into the shed with 60ft of 14-3 outdoor wire and 2) run wire to the edge of the patio outside the sliding glass door to create a switch. This process involved Tim digging/ separating the grass while I ran the wire as far down as I could. My dad was working on the outlet/ actual electricity.

We wanted the switch for the lights on the outside of the shed to be located close to the house. If you have to walk across the dark yard to turn on the outside lights, what’s the point right? We then added a second switch inside the shed to control the inside light.


I have some house paint left over from when I changed out the house numbers. Tim and I were talking about painting the gray wire protectors in the house paint to that it blends a little more.


My fears were calmed about the destruction of my grass. Here it is today, the dig line barely visible!
I don't think I ever shared that I was able to add a cute little widow planter to the side window on the shed. 
So here is the finished shed: 

Oh and look at how nice it looks at night!


Sunday, May 20, 2012

DIY Body Scrub

I have used Bath and Body Works aromatherapy scrubs for years. With my desire to use more natural products, I have been looking for an alternative. The one thing I dislike about the switch to natural products: the cost! Why are products so dang expensive?! 


Then about a week ago I was getting a pedicure and asked them what they use in their scrub: sugar and scented lotion. She said it saved them so much money! So I decided to make my own body scrub. The best part is I had all the ingredients on hand! I did purchase a two pack of snapware to store it in but that was my only cost! Here is what I did. 
The players:
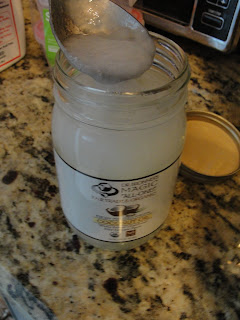
1) Dr. Bronner's Fair Trade Organic White Virgin Coconut Oil
2) Olive Oil 
3) Raw Brown Sugar
4) Sea salt (optional)
5) Snapware Container


I used a regular mixing bowl since all these items are edible! First I added the Coconut Oil. If you aren't on the Coconut Oil bandwagon yet you are MISSING OUT! This stuff is amazing both to use in the kitchen and as a skincare product.Here is a article of 52 ways to use Coconut Oil. Oh and it smells delicious! 
There really are no precise measurements. You will want to get it to a consistency you like.First, I added my coconut oil to the bowl. (FYI: THE melting point of coconut oil is 76 degrees, anything cooler then that and it will be quite solid). 
Next I added my sugar, olive oil and a bit of coarse Sea salt. I chose sugar over salt because it is gentler on the face. I just put in a little salt for a bit of coarseness. 
Mix your ingredients until you achieve the desired consistency. Then place in a storage container. 
I chose the Snapware containers for two reasons: 1) I wanted something that sealed well to prevent water from coming in and 2) I wanted something that would fit in the shower well. This worked like a charm! 
I used the scrub for the first time yesterday and it is just as good as anything you can purchase! I LOVE the smell of the pure coconut oil but you could infuse it with other essential oils as well. My skin was left feeling soft without any oily residue. I love that I know exactly what is in it and saved a ton of money (Bath and Body Works sells their scrubs for close to $16 for a similar sized container). 

Hope you enjoy as much as I do! :) 

Thursday, May 17, 2012

Dining Room Inspiration


Lately I have been itching to make some changes in the dining room. We have only lived here a little over a year… I know, it is an addiction.

I love the color of our dining room. It’s a nice green and it really pops with the white crown and dark furniture.  However, it does not pop with the white tile floors.  So I have been looking for an area rug for under the table for the past, I don’t know, 15 months? I am picky and nothing seemed to stand out to me. So I sort of gave up.

Then I saw this light at Lowes. I loved it and it was so much better than what we currently have:
Old light (which has paint splatters from our "flipper".)

So I cashed in some credit card points for a Lowe’s gift card and used a $10 off $50 Lowe’s coupon to purchase the light. This has now been sitting in my garage for 2 months :( 

Then in the midst of my parent’s kitchen makeover, I was at Home Depot picking out a paint color. It happens to be next to the flooring department where they had a large selection of area rugs. I spotted this guy. I liked him but wasn’t sure Tim would be sold. I snapped a picture to show him when I got home and he too agreed it might work.
So here is rough draft of what I am thinking. Pardon the poor quality. I really am trying to get better with Photoshop!


I found the shelf inspiration on Pinterest from IheartOrganizing. And we could definitely use the wine glass storage to free up some cabinet space. The monogram is cut from the aisle runner at our wedding and is already framed and hanging in the room. I must say it is one of my favorite things in the house. 

Add mini dining room makeover to the 2012 "to do" list! 

Wednesday, May 16, 2012

Mexican inspired soup

The other day I made this AMAZING soup. I know its summer here in Florida but I LOVE soup! And I have been on quite the kick latley... Plus leftovers make great lunches.
Tim was out, I had a nail appointment so Tuesday night I decided to just stop and get a quick rotisserie chicken for dinner. Something fast and easy, although I typically make homemade. The next night, we had BBQ chicken and corn on the cob cooked on the grill. I decided to use the leftovers of both of these meals to make soup and I am so glad I did.

Now I am relatively new to the whole make your own stock thing but I really like the idea of knowing exactly what is in the stock and that it is not overloaded with sodium.
So here is what I did. I took the chicken carcass with a good amount of meat still on it and put it in a large pot. I then added two empty corn ears from that night’s dinner, along with a whole onion, a whole carrot and some whole stalks of celery. I also added a bit of thyme and pepper for flavor. I filled the pot almost to the top with water and let it cook for an hour and a half. I then drained the broth from the goodies, saving only any remaining chicken and discarding the rest.

I let it sit in the fridge overnight and then skimmed any fat off the next day.  When I got home from work that night, I decided I wanted something with Mexican flavors. I used all of the broth and chicken and then added the following:

1 Can of corn, drained and rinsed
1 can of Black Beans drained and rinsed
1 can of Rotel with green chilies
1 onion, diced
1 TBSP dry ranch dressing mix
1 tbsp. Chili Powder
1/2 tsp. garlic powder
1/2 tsp. onion powder
Sprinkle of crushed red pepper flakes
¼ tsp. oregano
½ tsp. cumin
½ tsp. black pepper

Everything is already cooked, so you are really just boiling it to heat it and blend the flavors. I let mine simmer for 20 minutes. It made about 6 servings.
I recommend serving with a bit of shredded pepper jack cheese. YUM! 


Thursday, May 10, 2012

Gates


When I shared our new pavers a few weeks ago, I failed to mention another problem we had: our gate no longer fit. You can see in the picture below that we are missing the gate which enclosed the backyard.

Th gate attached right after the gutter. You can see the  hinge on the right.
Since the pavers were now level with our existing deck, the gate was about 6 inches too long and therefore could not be reattached. As a temporary solution, we laid the gate on its side and placed one of our outdoor chairs in front of it. Not ideal but with three small dogs, we had to make sure they couldn’t wiggle out. Well last Friday night, something wiggled in.
Max ( aka: Louie) 
Yep. I came home to find this little man in my backyard. Luckily, I was able to find his owners the next morning but this definitely lit the fire under us to finally address the gate issue. I had the gate and fence installed by a professional. Aside from my gutters, I think this is the only project I had NO desire to DIY. We weren’t sure if the gate could just be cut down. Thank goodness for handy fathers! He came over; we disassembled the gate, cut 6 inches off and re-assembled it. Leaving things looking like this:


But the gate fun did not stop there! Tim and I had been talking for a while now about adding an additional gate to the right side of our house to hide the a/c unit, sprinkler system, trash and recycling from street view. Well I called our original installation company to get a matching gate and was FLOORED by the price! $700 to come out and install a matching gate, $400 if I wanted to just purchase the gate and install on our own. Still way more than the $250 budget I had in my head.


So when Tim and I received a coupon in the mail from Lowe’s, we decided to go checkout the gating materials. We found this panel which was very similar to our vinyl fence. We also found this gate kit. We decided to take the plunge. We purchased 1 panel, 1 gate kit, 1 6 ft. wood post, 1 6 ft. post cover, a lock kit and some extra-long screws!
First we mounted the wooden post to the side of the house. 

 Then we cut out one side of the vinyl post cover and “clipped” it on to the wooden post.

Next we cut the panel and assembled the gate following the instructions in the manual. We were hesitant about using only glue so we also reinforced it with white screws. I am not going to lie, this was not a quick process and it definitely takes at least two people! This is the finished product.


We did have to make a second run to Lowe’s for a post cap and handle. I am estimating my total to be around $155! Sometimes it definitely pays to DIY!

Sunday, May 6, 2012

Who doesn't love Ikea?

Yesterday was my birthday. Tim and I went out with some friends for sushi Friday night but yesterday was pretty low key. My dad helped us finish up two larger projects around the house (I will post about it tomorrow). We were so exhausted when we got done yesterday that we decided to hold off on the birthday events until today. We had lunch at the original Columbia in Ybor City. Its amazing how much culture is in that small city! I indulged on their amazing sangria and one-of-a-kind "1905 salad"...oh and hot Cuban bread, way to much hot Cuban bread.

Next it was off to Ikea, since its about 2 blocks away. No one went for anything in particular, we just wanted to browse. Well my browsing resulted in my spending about $80. Here is what we got:

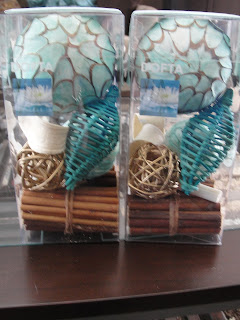
I picked up two of these Dofta potpourri boxes. They were $4.99/ each. I originally only had one in the cart but decided to run back at the last minute for a second, SO glad I did.


My mom had gotten me this cool Stokholm bowl a couple of months back and honestly, it has been sitting in my guest room.  
 When I saw the Dofta box in teal, I decided it would look great in our Family Room/Office.
I was right! :)

We also got some random kitchen items:
An ice cub tray ($1- which I am currently using to make Disposal Cleaner), a rolling pin ( Confession: I have totally been using a soup can to roll dough for homemade tortillas and pizza), two of these BPA free jars ( I already use one for my pasta but wanted two more for flour), a two pack of red funnels (unpictured- $.99 for my laundry soap making) and a pack of dry erase markers for the husband. Oh and he also got a 6-pack of these fun beer glasses for $10.
Immediately upon walking into the store I scooped up this small white pot ($1.99) and artificial plant ($3.99) which are now living on the storage cabinet behind the toilet in the guest bath. I love how the white ceramic pot mimics the detail in the Wainscoting

And lastly, I found this 24" Havtorn Farm floor vase. I have been hunting for a large standing vase for the corner of the guest room but refused to pay $40 which seemed to be the going rate at Homegoods and Joann's. This one was much more reasonable priced at $24.99. I got the simple white sticks (similar to this for $5.99) to go in the vase but I will be whipping out the spray paint shortly! 

While I didn't anticipate spending $80, its amazing how much you can get for your money at Ikea. Oh, and extra discounts if you are a member of their "Ikea Family" Program. 
Sadly,this ends my birthday festivities and closes out the weekend. It's back to the grind tomorrow! 

Tuesday, May 1, 2012

DIY:Building a Cornice Board

After almost 25 years in the same house, my parents JUST got around to updating their kitchen. I will likely do a whole post on their kitchen in the near future ( Can we say jealous?). Well this weekend my dad and I set out to make cornice boards for both the window over the sink and the sliding glass door at the back of the room.

Prior to getting started I turned to my friend Google to look up various methods. My dad is SUPER handy and did not like any of the methods we found. So I am sharing how we did it, although I am no way stating those ways are inferior. I simply followed the man with the plan :)

Because the slider is over sized, we were limited on what wood we could use. We did not want to use MDF for the simple fact that it weighs a TON. We decided to go with Pine board: its light weight, about an inch thick and was the perfect length (8 feet).

So my dad assumed we would be making straight cornice board like so:


But true to fashion, I had to make things difficult. I wanted to add a bit of dimension like so:
Picture from Window Fashions


My mom agreed and since it is her kitchen, my dad finally came around!

We purchased 4 yards of fabric at Joann's due to the length of the slider. The fabric was 54" wide so we were able to get both cornices out of the width.

First we cut both boards to the proper width for each of the windows. We measure in the desired length ( 8 inches), marked it with a sharpie and began our curve. We used a piece of trim to trace out the curve...we held it at the pre-made line,  bent the trim to create the curve and traced it with a sharpie. We then sawed along the line and sanded the edge.


Then we added the top and connecting sides to create something that looked like this:


I wanted to add batting to make it look more plush however it took away from the clean curvature. So we simply upholstered the cornice with the fabric. Isn't it a fun print?


Now pardon the next two pictures...they are BAD. I didn't have my camera so I was forced to rely on my iPhone and the lighting was causing all sorts of shadows. I will post clearer pictures in my kitchen update post!


End of code